Showing posts with label craft. Show all posts

Elephants, Envelopes, Eggs & an Elf! Crafts for Letter E


How do you choose which vowel sounds to focus on when you create a letter of the week format for young children?  I try to make sure that one sound is introduced: only one.  And it is always the short sound.  There will always be time later to introduce the knowledge that every vowel has a second sound.  That's what makes the vowels stand out! 


But I admit, this can make crafting tricky!  There aren't THAT many items that begin with the short e sound as you might first imagine.  And we want things that young children can actually relate with.  Things that are already a part of their world. 

I also always try to include one animal in the batch of crafts for letters.  Children love animals.  They learning about them and they love stories involving them.  And there is, of course, no better animal for letter E than the ever popular Elephant! 


Our Elephant Craft is a basic cut and paste.  You can see the example of the finished craft in the bottom right hand corner.  We also have a black and white version which is perfect for following up the story of Elmer.  You know the Elmer story, right?  By David McKee? If you don't, take a listen:


Elmer is such a great story, and one of my young students colored a VERY colorful elephant after she listened to Elmer.


This little elephant alone is enough to run over and pick up our new E craft packet

But let's check out the other crafts, too.  I want to show you our fun little mailbox that is so good for pretend playing with Envelopes.


Learning more about mail and envelopes is a perfect study for Letter E.  And so I also include our booklist for letter E, which has some fabulous suggestions for kids to learn more about mail.


Also included in our Craft packet is a marvelous Egg craft that involves crushing eggshells.  Small children love the tactile experience of feeling eggshells crunch under their hands.  If desired, you can even paint the shells before you crunch them, like we did below:


But regardless, the end result is this adorable little spring chick:


Lastly, our Elf Craft Sheet is fabulous.  Here's the colored version:

But we love it best when the children get to personalize their little elves, and color them up on their own. 


Learn more about this fabulous collection of crafts for E (the short sound), here in our store.


Dandelions, Dogs, Dinosaurs and Ducks: Crafts for Letter D


When I am looking a little something extra for little bodies to do, my preference always leans toward the haptic activity.  I was such a haptic learner when I was a child:  anything I could pick up, grasp, touch, and feel was much more likely to be something I retained.  And I find as I teach, that probably most small children fall into that category at the Kinder levels.


This Dandelion craft seen above, is exactly that kind of activity.  Sure, we have the black and white version so the children can color it first, but the real fun begins as soon as they stick on the play-dough (or clay or Styrofoam ball) and start filling the thing full of Q-tips that have been cut into halves or thirds.  That is the best.

I love to follow up a craft with a great story, and yes, thanks to my Children's Librarian background, I even have a great story about Dandelions.  It is The Dandelion Seed by Joseph Anthony and you can check it out on this read-aloud.


Thus begins our four new letter D crafts in our brand new D Craft packet which you can purchase in our store!


But let me give you a glimpse of the other three included crafts, too.  First, you can't let letter D go by without doing something with Dinosaurs.  Our Dinosaur craft uses shape identifiers (square, circles, triangles) to allow children to put the dinosaur shapes exactly where they're supposed to go.


Another fun craft that we offer in our D Crafts packet is a duck craft.  This little critter takes a lot of cutting and folding: perfect activities for those little ones who still need to practice this kind of hand-eye coordination.


And last but not least, we also include a little Dog craft, using a toilet paper tube.  This is one of those projects that your little ones will go home, holding proudly, and maybe include in their pretend play.


As you know, if you follow my blog, I can hardly let a craft go by, without recommending some great read-alouds to go with it.   So, in our letter D craft packet, I include a letter D Booklist.  You will probably find some books you are familiar with, but hopefully, I have given you a few new ones to check out, too:


Each of our crafts has a place for children to write their names (or have an adult write the name) so that student works are easily identifiable.

You can find all these crafts shown here,  and our other fun Letter Craft packets in our store

Caterpillars, Cows, Cats & Crabs: Crafts for Letter C


Letter C is the time when you can really start creating with little ones if you are following through with a kind of letter of the week format.  They are now beginning to expect that their time with you results in an amazing creation that they have somehow personalized into their very own.  Followed up by a story or some sort of learning time that highlights this new thing they have made with their own hands. 

We can't disappoint them now!  We have created this fabulous Letter C Craft Packet to cover four letter C crafts that will come in so handy for students of later aged preschool through the 1st grade. 

Let's begin with our Crab Craft:


This little guy utilizes either a stamp pad or fingers dabbed in paint for his legs.  The only trick will be ensuring that the paint from student fingers only ends up on our specially made beach image, and not anywhere else.  (A box of handy wipes after paint use does the trick!)

I have such a fun story to recommend for this Crab Craft creation.  It is Bill Peet's Kermit the Hermit.  It is a longer story, and will be best for students who are age 5 and older, but the imagery is engaging and the little blue crab gains our empathy early on.   If you have younger kiddos, I'd recommend Eric Carle's A House for Hermit Crab.

Next, let's look at our Cow Craft: 


This sleepy-eyed fellow is a perfect follow up to any of Doreen Cronin's Click Clack Stories.  One of our favorites is Click, Clack, Moo: Cows that Type.  The version of this read aloud that I found for you here, would work excellent for classroom viewing:


If you would prefer a Duck Craft as a follow-up to this fun story, I would also recommend our Letter D craft packet, which has a fabulous duck craft included!

All of our craft packets include both a black and white version and a color version for easy printing of your preference. 


We couldn't let the Letter C go by without creating a craft that included our favorite character, our very own Glimmercat.  But to those who aren't familiar with her, this craft can be simply a fun cartoon cat, white with gray spots.  This one turns out best if students use a slightly thicker paper: a light card-stock would be best!


As you have noticed, we like to recommend great children's stories for read-alouds with our crafts, and also included in our Letter C craft packet is our recommended Book List for these crafts. 


And last but not least, let's look at our Caterpillar Craft: 


Every Letter C Craft packet should have a good quality caterpillar craft included because caterpillars are so fun to learn about and discover.  My students have always loved making patterns with their pom-poms as they glue them onto their spaces, and cutting out the Caterpillar eyes and feet gives them some delightful hand-eye coordination to work on.

Check out one of the above suggested books for Caterpillars (Waiting for Wings and Ten Little Caterpillars)  for some great follow-up read alouds. 

Be sure to check out our Letter C Craft Packet in our store!  Happy Crafting!

Apples, Astronauts, Ants and Alligators! Crafts for Letter A


There is no doubt about it:  crafts are an undervalued part of the education process for young children.  And yet SO important!  Those little hands still need opportunities for hand-eye coordination and those little minds delight so much in the ability to create things.  Using a craft to connect the dots between a letter/sound or a read-aloud story, take that learning to another level.  So while the temptation is to put craft-making on the shelf, I'm trying to remember that it is an all important facet of the daily process. 


Our latest Craft Packet tries to keep in mind the types of crafts that can be most easily implemented in the classroom, as well as keep them fun and entertaining for children.  Not too difficult, but still challenging those little hands with using scissors, and working in letters when appropriate. 

Above, in our Ant Craft, we use the Letter A to make the Ant's lower set of legs.  Children draw in the letter A before gluing on pom-poms to form the body.  It's a perfect follow-up to learning the song, "The Ant's Go Marching":


 ...or reading a favorite children's book about Ants. 

In fact, here's my recommended children's book list for letter A, perfect for reading out loud and perfect for introducing apples, astronauts, ants and alligators to little ones!


Our Alligator Craft will challenge those small hands with extra cutting, but it is a very rewarding finished product to little people who still see paper creatures as a kind of new toy. 


We love pairing this guy up with the story "Hooray for Amanda and her Alligator" by Mo Willems (see our Book list above). 


Apple crafts are a dime a dozen, but we suggest having students poke a little hole in their apple that their finger can stick through.  A little happy face drawn onto their "worm" finger will make their face light up with smiles. 

One of our favorite science videos is "Cat in the Hat:  Space is the Place".  


 There's no better way to follow up Nick and Sally meeting an Astronaut then to let children put themselves in space with the awesome photo craft. 

All of our crafts are also available in black and white, so if you want them to practice coloring their crafts to make them truly their own, that possibility is there:


Feel free to look at our Letter A Craft Packet in more detail in our Store.  This is a printable packet, requiring glue, tape, scissors, printing ability, and little else.  You can check it out here today.


Medieval Stained Glass Craft


We have been doing some fascinating activities for our Medieval History unit, (Viking Runes, Medieval Illuminations, and our own homemade Medieval Subtleties) but this craft or "craftivity" turned out the most beautiful of all.  We created our own stained glass windows!


This is an easy activity, especially if you purchase our premade Medieval Window packet which includes 4 possible designs for your students to choose from to make their window.


You will also need a transparency sheet (or some recycled flat plastic), a sharpie, food coloring and glue.  And some Q-tips.  Because we always fall back on Q-tips as an easy go-to paintbrush for these kinds of activities.


After drawing the designs on the transparencies with black sharpies, we cut out our window shapes.  And we began to fill in the window shapes with our glue paint.


To make it easier, we cut out our paper design and taped it, along with the transparency to the table.  It kept our image stable while the kids filled in the colors.


After the colored glue had dried, we cut out our window edging and glued it over the glass.  An optional idea is to go over the top of the sharpie with black puffy paint.  This raised black edging makes the stained glass really pop.  It feels just like the leaded glass stained windows you might see in an old church or heraldic window.


The finished product is tacked to the window so that the light can stream through, just like it streamed through Medieval stained glass windows, many years ago.


A beautiful finished product!  Check out our packet that includes everything you need to create this craft, here in our store.

Reviews

"My students were completely engaged and created a great deal of stained glass with this project. We researched how stained glass was made with Medieval techniques (the V&A Museum has a fantastic video!) and then we got to work, having unearthed a box of old transparencies, which I think really makes this project. We also were creating them for our Medieval Faire for our K-3rd graders and they found the stained glass captivating. I would have never guessed they would have looked so good! Excellent lesson!" --- Anne C.

"Loved the informational text. It was so helpful. The activity wasn't as engaging as I'd hoped, but it was still worth the purchase." --- Get Schooled

"We a learning about the role of churches during the Medieval time period so this is a great supplemental for us and a nice break from the heavy reading and material. The students enjoyed creating these." ---  Pham-tastic Teaching
 
"One of the better stained-glass projects I've seen. Worked greatly for my A&H class!" --- Eli Edwards

"We used the patterns to make our own stained glass. We used sharpies instead of glue and they came out beautifully." --- Tippecanoe

"I used this resource to supplement what we were learning in class. My students loved the activity?" --- Wendy E.

"This was a fun activity to do in my summer program during medieval week." --- Karen C.

"My students really enjoyed making them, and were so proud of the outcome.  We did what someone else suggested and just used permanent sharpies.  They look awesome!" --- Randy Bland

"My students loved this activity! We completed it in the middle of our Middle Ages reading unit. To make them even more stained glass in appearance, they lightly used a cotton ball to spread vegetable oil on the back to make them translucent." --- Dayna K.

Check out our packet that includes everything you need to create this craft, here in our store.

We're Vikings: The Terrors of the Sea!


It's admittedly quite a change up.  A few weeks back we were pretending to be monks, living quiet, humble lives in our stone monasteries, doing penance on our knees and tasting pottage and mead.  And today, we're learning about Vikings, a bloodthirsty group who'd slaughter a monk and make off with his pottage.

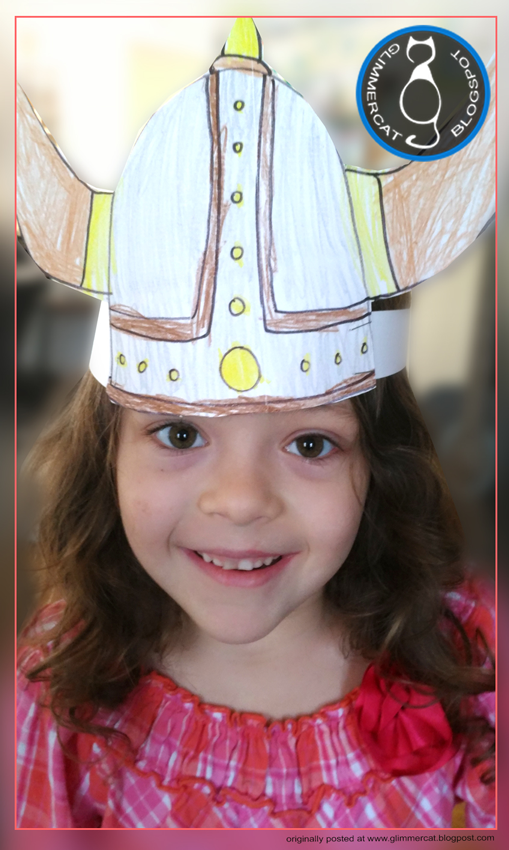
After we read up on Vikings and their many journeys across the Atlantic, exploring Iceland and Greenland and North America, we decided it would be fun to create a Viking helmet and shield.


Although I created a color version and a black and white option, the kids wanted to color their own.  And maybe add a few extra designs to make the helmet truly their own.


A bit of color, a few fine jewels drawn on:  we're definitely getting the hang of what Vikings valued back in their time period.  That, and land.  They did appreciate a good piece of land, didn't they?


After we completed our helmets, we were ready for more!  The shields were brought out!  Now I admit, I did not intend these shields to be used in pretend play.  The idea was to let the kids design their very own shield:  with colors or images that made it uniquely theirs.


 We were printing on card-stock (I always print these kinds of things on a good thick sturdy card-stock!) and rather naturally, the kids cut out their shield once they'd colored it, stapled on a hand grip and were deep in Viking combat almost before I knew what had happened!


Those paper swords were kid created, out of a rolled up and stapled card-stock sheet.  These shields aren't sized accurately.  Let your kids know, if you try out this activity, that actual Viking shields were at least 32" in diameter, and the boss in the center, was like a 6" dome off the front!


The next day, these kids were still hot to trot about Vikings.  So, we investigated a bit more and came up with these fun activities!

First of all, runes!  There are several different Viking alphabets because they were always adding more as they conquered new peoples and added that to their language, too.  The alphabet we share in our Viking Activity packet has 21 characters.  As we looked over the characters, we could see several that are in our own English alphabet today (with a bit more curvature).  We also watched this excellent introduction to Viking runes:


After that, the kids were ready to try out carving runes of their own.  We made our own dough (using flour, cornstarch, coffee and one drop of blue food coloring) and we drew our runes using plastic knives.  This was easier to do than I first thought it would be.  The Vikings knew what they were doing with that upright line based alphabet!


And last but not least, we decided to create a paper model of a Viking longboat.  This, along with all the activity pages in this post, is available in our Store.  You can print out a fully colored version or and black and white one for coloring in yourself (my kids always prefer that!).


Now the cutting was a bit tricky for my 5 year old, admittedly.  She needed a lot of help.  But once I explained that all the dotted lines were for folding, she went after those folds.  Great folding practice!


We used glue, staples and tape for attaching things.  Staples were best for the mast, and glue was best for affixing little tabs together.  But the finished product looks neat and was fun for pretend play while I read out loud a bit more about those villainous Vikings!


And we finished up our Viking study by putting on "How To Train Your Dragon" just for fun.  It's always important to clarify what is fact and what is fiction in these stories but you just can't go wrong by hanging out with Hiccup.

All of the activities previewed here are available in our store for purchase.


Thanks for reading, and please share your favorite Viking activity in the comments!